You never know what’s behind those cabinet doors. Yes, it’s always a mystery. Also, we all are well aware that cabinets are the big parts of the kitchen and any other place in your house. If you do not have cabinets, then it is clear that you are lacking an important part. Cabinet doors can be messed up after prolonged use, and sometimes changing the entire cabinet or the doors can cost an arm and leg these days.
However, there is always an alternative or option, which is to create something on your own that is too within budget. If you have the right skills, then you can always make your own DIY cabinet doors to revamp the look of your kitchen or any space. However, this is going to take a lot of your time and patience, but it is all worth it once you are done.
However, we have 15 easy DIY cabinet door ideas that will not harm your pocket and also give you satisfactory results.
Ideas for DIY Cabinet Doors
Fortunately, there are numerous budget-friendly DIY cabinet door options available that can give your cabinets a fresh and stylish look without breaking the bank. However, we have shortlisted 15 easy DIY cabinet door ideas that can transform your space on a budget:
1. Stenciled Door
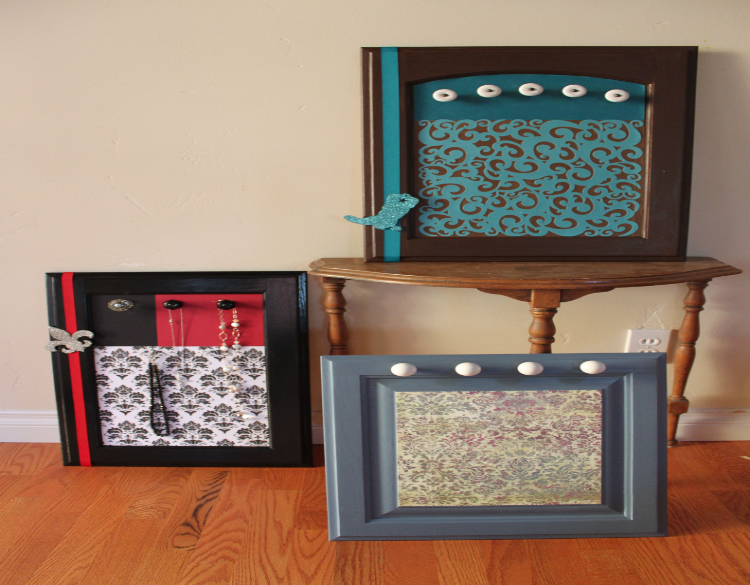
Suppose your cabinet has lost its previous charm and needs some glam up. Then you should try these DIY cabinet doors ideas, which is painting them with beautiful patterns. At first, you can paint the background of the cabinet and then let the color dry out completely. Further, you can stick a stencil in place on the door. If you feel like your cabinet doors have a recessed panel, then you need to resize the stencil to fit the doors. Further, use a stencil paint brush to paint the areas where the stencil is not pasted in a tapping motion. Then just peel off the stencil to get your painted pattern.
2. DIY Herringbone Design
This is an interesting DIY cabinet door idea. Herringbone design is a set of amusing patterns that gives an amazing new look to your cabinets. You can start by dividing the door into four vertical parts, where you can mark the lines with your pencil. Further, you can purchase edge banding in various sizes and species of wood and melamine. It is easily available in most craft and hardware stores, and mostly they offer iron-on varieties and peel-and-stick options. Now you need to cut the banding into strips at a 45-degree angle.
This is done so that it can easily stick between the drawn lines. Also, you need to keep in mind that every other section of banding will be going in the opposite direction, so you need to arrange the sections of banding in such a way. Additionally, make sure that the colors are also different from one another and the species of the wood in your design. After all the pieces are attached, seal the cabinet with a polyurethane wood finish for that polished look.
3. Choose a Quirky Wallpaper
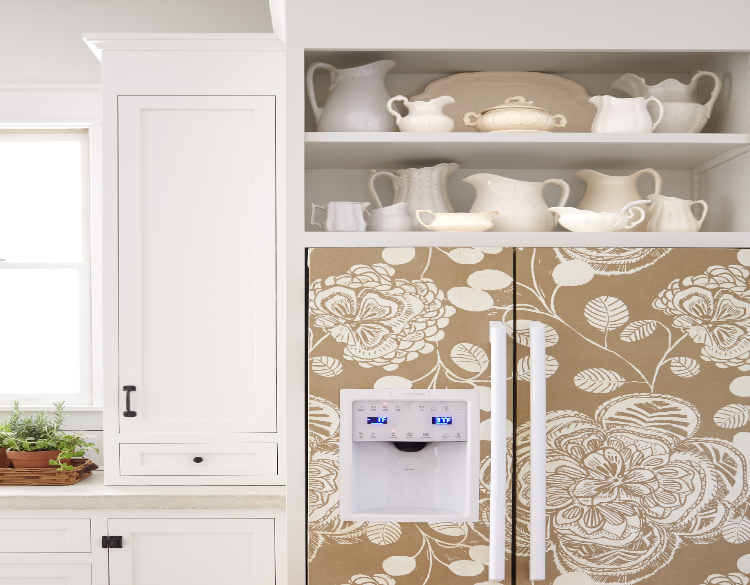
Wallpapers are affordable DIY cabinet doors used to add a new look. However, you can choose any wallpaper design as there are so many options available in the market. However, you need to paint the cabinet door with semigloss interior latex paint. Later on, when the paint is dry, you have to spray adhesive and stick the piece of scrap wallpaper on the required space of the cabinet. Further, to seal the surface, use a paintbrush to coat a thin layer of decoupage medium over the wallpaper and the entire DIY cabinet doors.
4. Add a Sheet Metal
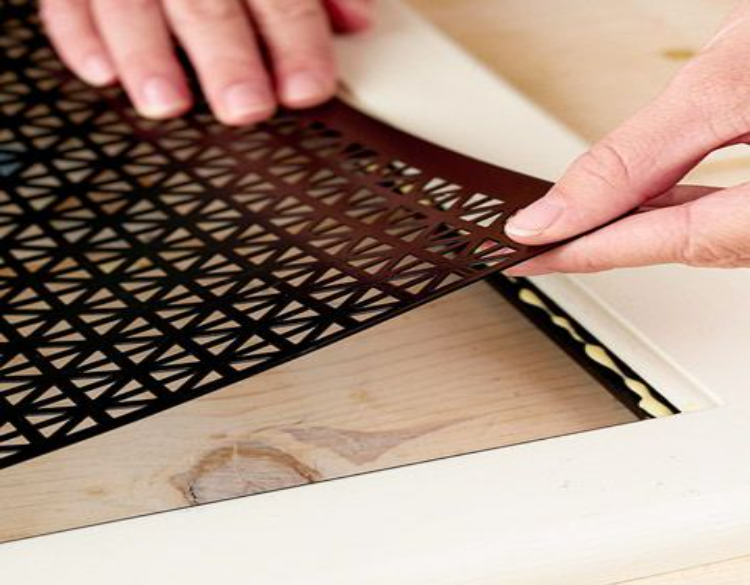
This is a quite common DIY cabinet door revamp idea. However, it adds a vintage vibe while maintaining the modern look of your place where they are fixed. You need to remove the inner door panel with a jigsaw and then paint the cabinet door and let it dry. To construct a frame for the mesh insert, apply black paint to wooden strips and affix them to the rear of the door frame, ensuring they are partially visible from the front. Using tin snips, cut the sheet metal to match the frame’s dimensions, then attach it to the wooden strips using wood glue.
5. Chalkboard Painted Kitchen Cabinets
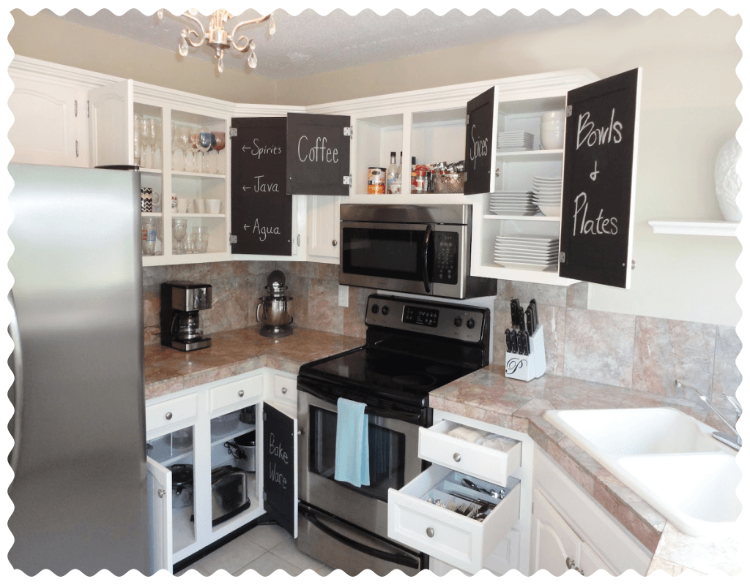
This is among one the fun and useful DIY cabinet doors ideas. Adding chalkboard-painted kitchen cabinets can help you a lot in making a list when you find some things that are about to finish from your grocery. Also, kids would love this installation as they can easily play while you are cooking something delicious for them. However, in order to have one, all you need to do is use a quick-release painter’s tape to cover the door frame. This is because only the inner panel will be shown, which will be painted with chalkboard paint. Thus, later you can remove the tape once it is dried out.
6. Drilled Pattern
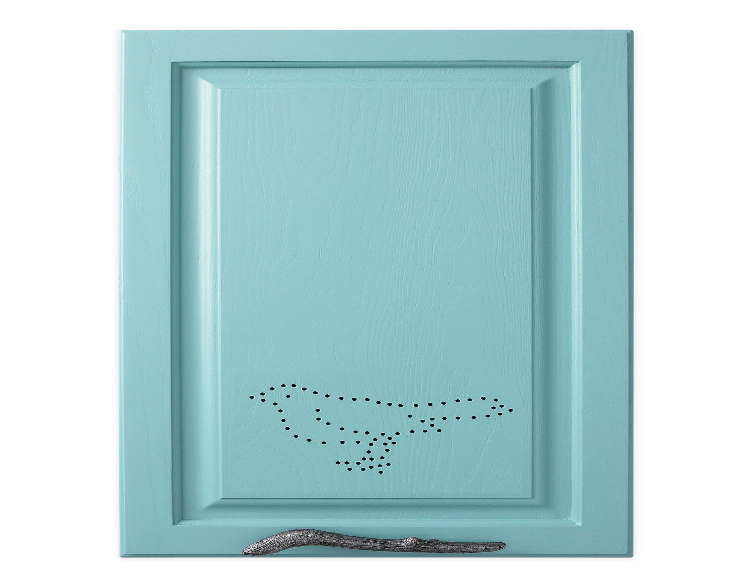
This is also a unique and fun DIY cabinet door idea that will add a touch of whimsy to your kitchen by incorporating a charming bird transfer and a unique twig handle. To create the bird’s outline, use a drill to make evenly spaced holes. Opt for two coats of glossy paint for kitchen or bathroom cabinets to ensure a moisture-resistant and easy-to-clean finish. If you prefer a flat or eggshell finish, enhance its durability by applying varnish or a clear coat over the paint. This way, you can enjoy a delightful and functional cabinet upgrade that suits your personal style.
7. Add Rollouts in Unexpected Places
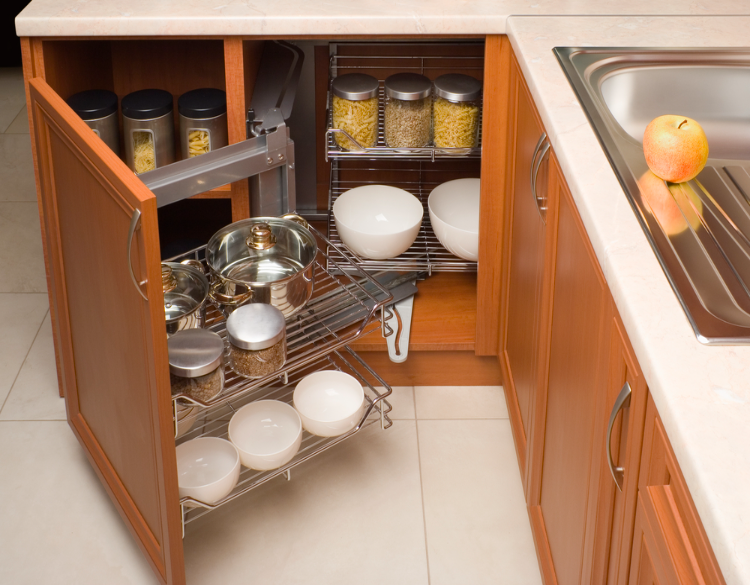
Another budget-friendly DIY cabinet door idea to enhance your kitchen space is by adding rollouts. Rollouts are a convenient and practical solution for maximizing storage space and making it easier to access items in your cabinets. You can purchase rollout kits from home improvement stores or online, or you can even make your own using plywood and drawer slides. Simply attach the rollouts to the inside of your cabinet doors, and you’ll have a clever organizational solution that won’t break the bank. Whether you use them for storing pots and pans, spice jars, or cleaning supplies, rollouts are a simple yet effective addition to transform your cabinet doors and improve the functionality of your kitchen or storage area.
8. Glass Inserts
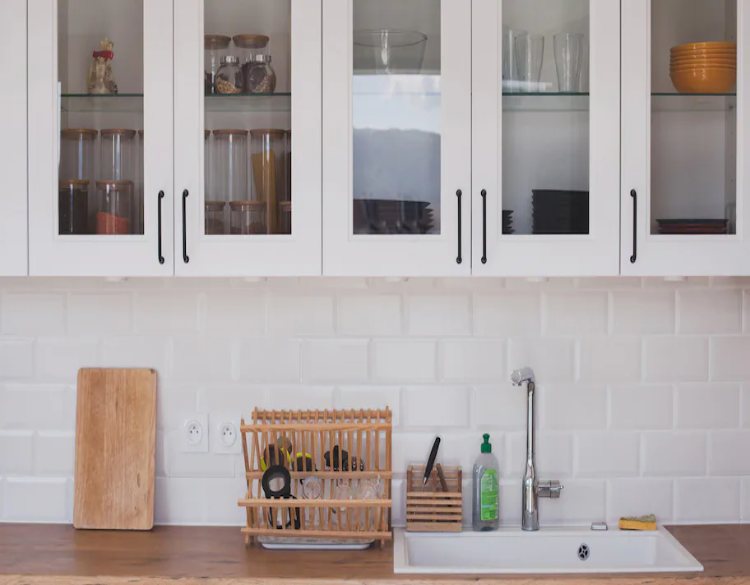
Glass inserts have also made a space in our list of 15 DIY cabinet doors ideas to upgrade the look of the place where they are attached. Moreover, glass inserts not only add a touch of elegance and sophistication to your cabinets but also provide a glimpse into the contents inside. You can purchase pre-cut glass panels or have them custom-made to fit your cabinet doors. To install the glass inserts, carefully remove the center section of the cabinet door and replace it with the glass panel, securing it in place with glass adhesive or clips. This simple yet effective DIY project instantly transforms the look of your cabinets, making them appear more open and visually appealing.
9. Barn Door Style
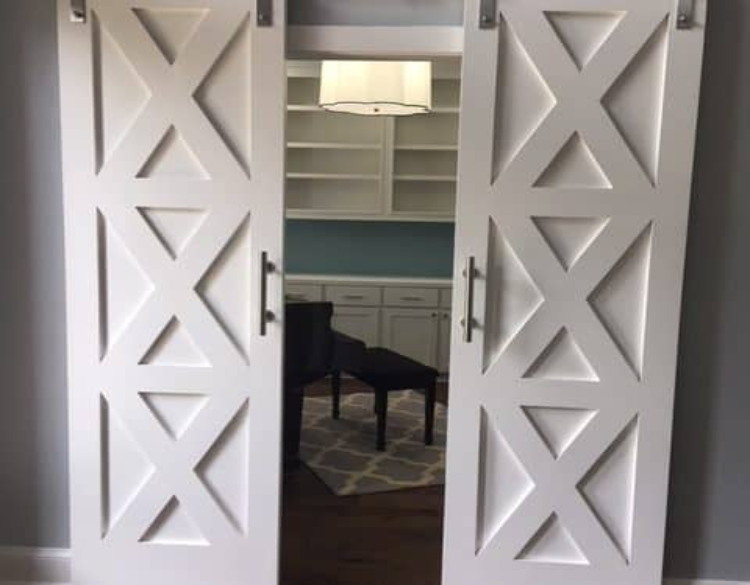
If you’re looking to infuse a rustic and farmhouse-inspired charm into your cabinet doors, the barn door style is a fantastic option that won’t break the bank. This DIY cabinet door idea involves attaching narrow planks of wood horizontally to your cabinet doors, creating a distinct barn door aesthetic. You can easily find affordable wood planks at your local home improvement store or repurpose old wooden boards for a more eco-friendly approach. Once you’ve cut the planks to fit the dimensions of your cabinet doors, attach them using strong adhesive or nails. Furthermore, you can enhance the look by staining or painting the wood to match your desired color scheme.
10. Two-Tone Design
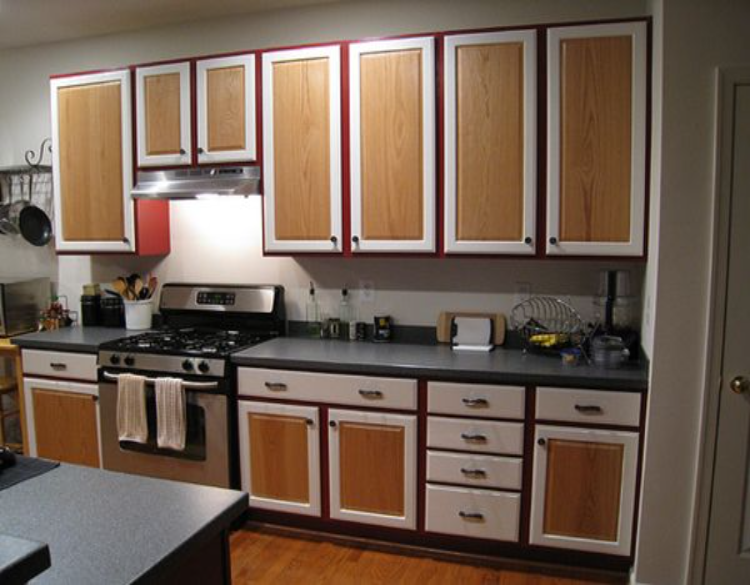
If you want to create a long-lasting impact on your guest, then you can surely use this DIY cabinet door idea. This budget-friendly DIY idea allows you to play with contrasting colors or finishes to create a striking visual impact. Choose two colors that complement each other and your overall kitchen or storage area aesthetic. Paint the upper and lower halves of the cabinet doors in the respective colors, or use different finishes like matte and glossy for added dimension. The two-tone design instantly adds depth and style to your cabinets, giving them a fresh and contemporary look without breaking the bank.
11. Repurposed Shutters
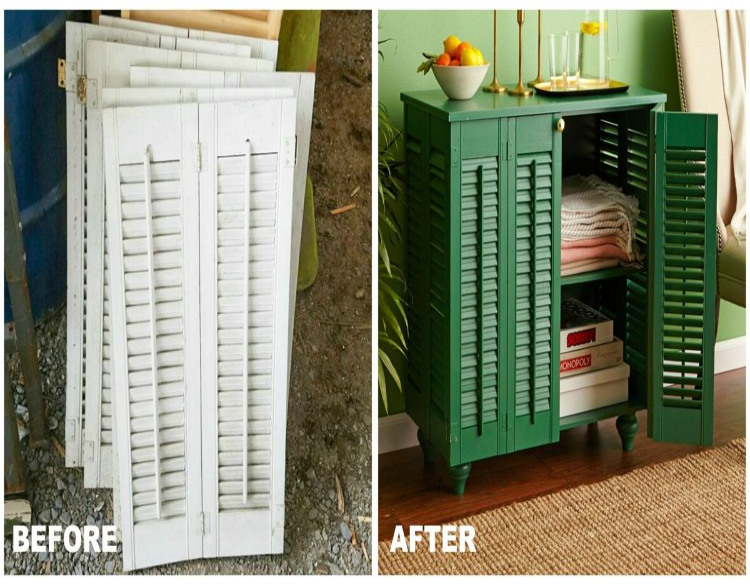
This is an eco-friendly and sustainable DIY Cabinet door idea to give a new look to your space. Mostly because it is made by giving new life to discarded materials. However, the first step you need to do is sand down the shutters to remove any roughness or old paint and stains. Now, attach the repurposed shutters to your cabinet doors, either by using hinges or directly securing them with screws. This upcycling project instantly adds a rustic and vintage touch to your kitchen or storage area, making your cabinets stand out. Whether you opt for weathered shutters for a worn look or a fresh coat of paint for a pop of color, repurposed shutters provide a unique and budget-friendly solution to elevate your cabinet doors.
12. Chicken Wire Cabinet Door
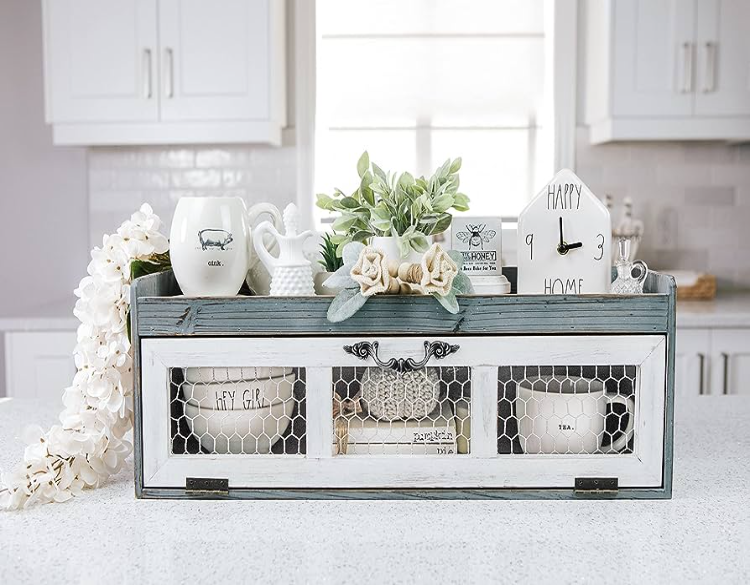
These DIY Cabinet doors will add a farmhouse look to the space where the cabinets are placed. Moreover, this budget-friendly solution will add texture and a touch of charm to your cabinets. Before you begin, just measure the dimensions of your cabinet doors and then cut the chicken wire accordingly but leave a little extra to fold over the edges. Secure the chicken wire to the back of the cabinet doors using a staple gun or small nails, ensuring it is taut and secure. The chicken wire allows you to display decorative items or create a rustic spice rack, adding both functionality and visual appeal to your kitchen or storage area.
13. Frosted Glass
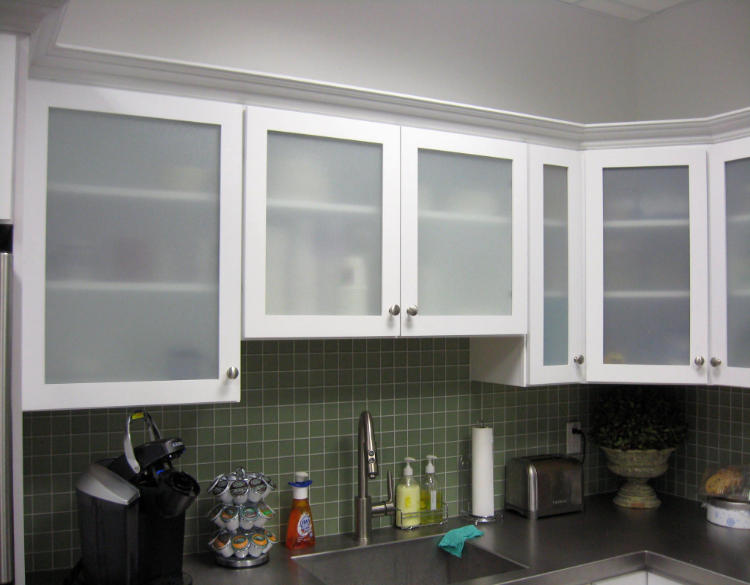
Frosted Glass is great DIY cabinet doors options for maintaining the privacy and hiding the contents of your cabinets. However, they are easily available in the market as you can either ask for frosted glass sheets or use frosted glass spray paint to achieve the desired effect. Carefully measure the dimensions of your cabinet doors and cut the frosted glass accordingly. Attach the frosted glass panels to the doors using glass adhesive or clips. The frosted glass creates a subtle and refined look, allowing light to pass through while adding a sense of depth to your cabinets.
14. Fabric Panel
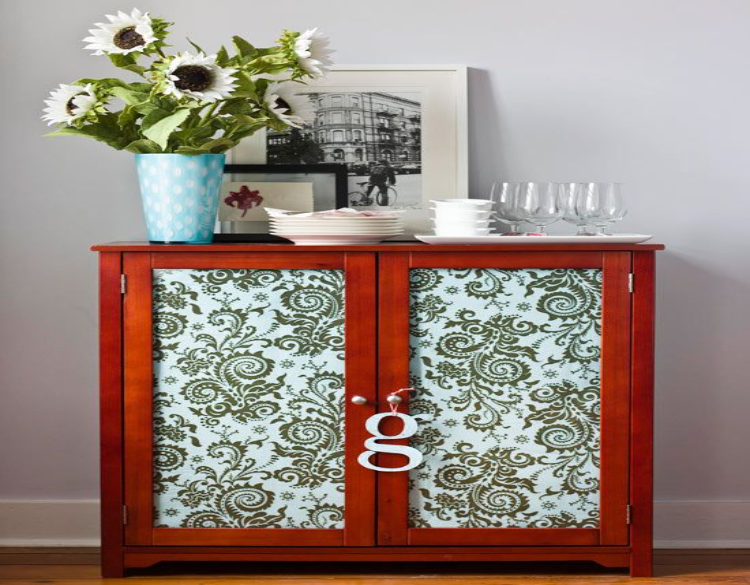
If you want to add a touch of texture while being on a budget, then you can surely use this DIY cabinet doors options. You can start by measuring the size of your cabinet doors and then cut the fabric accordingly. Just leave a little extra fabric for folding over the edges. Now attach the fabric to the doors using a strong adhesive or a glue gun. The fabric panels instantly bring visual interest and softness to your cabinets, transforming them into unique pieces. Choose a fabric that complements your kitchen or storage area, whether it’s a bold pattern, a subtle texture, or a vibrant color.
15. Geometric Patterns
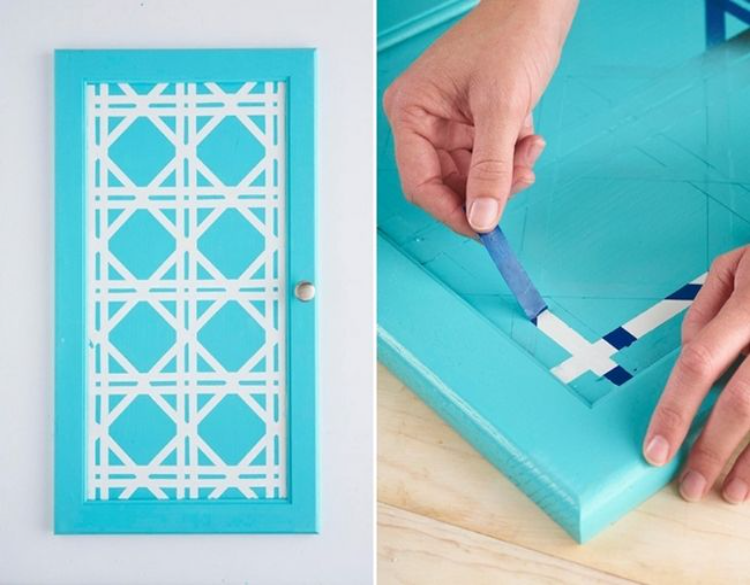
You might not like geometry during your school days, but you will surely like these geometric patterns on your cabinet doors. This DIY cabinet door option allows you to unleash your creativity and customize the look of your cabinets. Begin by choosing your desired geometric design and use painter’s tape to create clean lines on the cabinet doors. Select different colors of paint to achieve a unique and eye-catching design. Apply the paint carefully within the taped-off areas and allow it to dry. Once dry, carefully remove the painter’s tape to reveal your stunning geometric pattern. This budget-friendly project instantly adds visual interest and a contemporary vibe to your cabinets, making them a standout feature in your kitchen or storage area.
Conclusion
It is essential to change the look of the space you spend most of your time in so that you get that free space to get creative. The kitchen is the place you get creative with your spices to fulfill your hunger, so with these 15 creative DIY cabinet door designs, you can brighten up your kitchen space. Plus, the stand-out feature of these ideas is that they are so pocket-friendly that you can easily do it without thinking much.
From simple paint updates to more intricate designs, there are options to suit every style and preference. Embrace your creativity, roll up your sleeves, and give your cabinets a fresh and stylish makeover. Take this as a fun family activity and involve all the members to do the tiny part.
Enjoy this little artistic activity at home!