Are you puzzled by the markings and numbers on a tape measure? Irrespective of your identity, whether you are an avid DIY enthusiast or someone who has a deep appreciation for carpentry, comprehending the art of reading a tape measure is an indispensable skill.
In this blog, we will dive into the tips, tricks, and common mistakes involved in deciphering those tiny increments and fractions. By grasping the fundamentals, you’ll be able to measure objects and spaces with precision confidently. From deciphering the main markings to recognizing fractions and calculating measurements, we’ll cover it all.
Join us on this enlightening journey as we unravel the secrets of how to read a tape measure and equip you with the knowledge to tackle any measuring task with confidence.
Tips to Read a Tape Measure
A tape measure is a tool that holds great importance across various tasks, such as construction, woodworking, and crafting. The ability to read a tape measure with accuracy is important in obtaining precise measurements. Are you passionate about DIY projects? Or do you acquire professional expertise? In both instances, these tips will prove valuable in improving your skills. By implementing these tips, you can improve your proficiency in the art of reading a tape measure. It will ensure precision and efficiency in your work.
1. Make Yourself Aware of Tape Measure
To read a tape measure effectively, it is important to gather sound knowledge of its basic components. Before you get into the specifics, pause for a moment and study the fundamental elements of a tape measure. Most tape measures have markings in both imperial (inches) and metric (centimeters) units. The tape is divided into increments, usually displayed in fractions of an inch or centimeter. The tape itself may have a hook or tab on one end for anchoring the measure to an object.
2. Identify the Markings
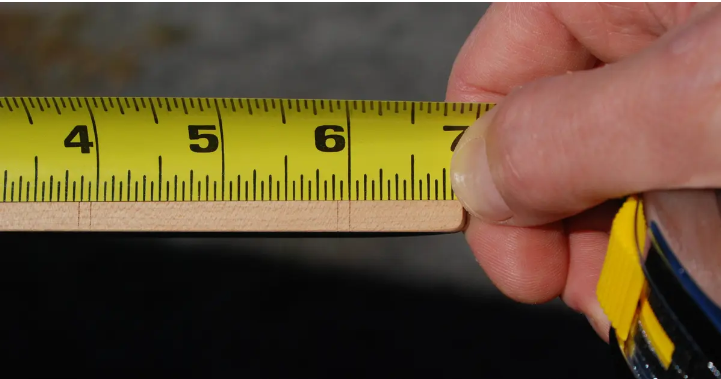
To read a tape measure accurately, start by identifying the main markings. On an imperial tape measure, you’ll notice large numbers at regular intervals, which represent inches. These large numbers are usually further divided into smaller markings. Each inch on a tape measure is commonly subdivided into smaller units to provide more precise measurements. These subdivisions include sixteenths, eighths, quarters, halves, and occasionally tenths. On a metric tape measure, centimeters are the primary unit, and they are divided into millimeters.
3. Read Whole Inches or Centimeters
To determine the whole number of inches or centimeters, locate the largest numbered line before the measurement you’re trying to read. For example, if the measurement falls between the fifth and sixth lines on an imperial tape measure, the whole measurement is five inches. Similarly, if the measurement falls between the seventh and eighth line on a metric tape measure, the whole measurement is seven centimeters.
4. Account for Fractions
When reading fractions on an imperial tape measure, start from the whole inch and work your way down. Each fraction has a specific line or tick mark associated with it. When using an imperial tape measure, you can identify an eighth of an inch by locating the second shortest line after the whole number. Similarly, a quarter of an inch is represented by the third shortest line on the tape measure. If the measurement falls between these two lines, it is read as an eighth of an inch.
5. Be Mindful of Markings on the Tape
Apart from the main markings, tape measures often include additional markings for convenience and precision. Some tape measures have red markings at every 16-inch increment, which is a common measurement in construction. These markings can help you quickly gauge the distance between studs in a wall or the spacing for floor joists.
6. Understand Metric Conversion
If you’re using a metric tape measure and need to convert to imperial units, it’s useful to know the conversion factors. One inch is equivalent to 2.54 centimeters, so you can multiply the centimeter measurement by this factor to obtain inches. Similarly, to convert inches to centimeters, multiply the inch measurement by 2.54.
7. Practice and Double-Check
Reading a tape measure accurately requires practice. Take the time to measure various objects, compare your results with known measurements, and make adjustments if necessary. It’s always a good idea to double-check your measurements by remeasuring or using alternative methods, especially for critical projects.
Developing the ability to read a tape measure is an incredibly valuable skill for individuals engaged in construction, woodworking, or any tasks that heavily rely on accurate measurements. It’s essential to consistently practice in order to enhance your proficiency and ensure precise outcomes by carefully verifying your measurements. By keeping these recommendations in mind, you’ll approach projects that demand exacting measurements with confidence and attain exceptional results.
Helpful Tricks for How to Read a Tape Measure
If you are a person working with tools, it is essentially crucial for you to understand how to read a tape measure accurately. Understanding how to read a tape measure is essential. Check out the tricks that would help you to be a pro at reading a tape measurement.
1. Understand the Incremental Marking
Before going into the tricks of how to read a tape measurement, it’s crucial to familiarize yourself with the increment markings. A tape measure typically consists of various divisions, including inches, feet, and sometimes fractions of an inch. The long lines indicate whole inches, while the shorter lines represent fractions. Each inch is further divided into 16 equal parts, while the shorter lines represent fractions. Each inch is further divided into 16 equal parts, resulting in smaller markings. By understanding these incremental markings, you’ll have a solid foundation for accurate tape measure reading.
2. Use the “Big Mark, Little Number” Rule
To avoid confusion when reading a tape measure, remember this simple trick: big mark, little number. The inch mark on a tape measure is usually accompanied by a corresponding number, which indicates the number of inches. If you’re trying to measure something and the line falls between two numbers, always choose the smaller number to ensure accuracy.
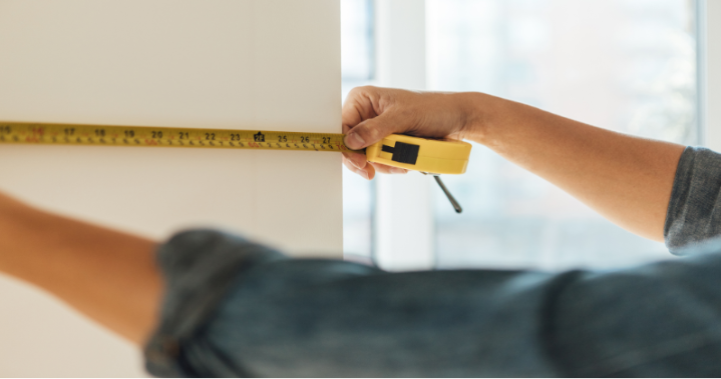
3. Take Advantage of The Red “Start” Mark
Most tape measures have a red mark at the beginning, known as the “start” mark. When measuring something, place this mark at one end of the object or surface you’re measuring. This will give you a reliable reference point, and it will help you how to read a tape measurement. This will enable you to commence your measurement accurately and facilitate the process of reading the measurement itself.
4. Identify Fractions
When it comes to reading fractions on a tape measure, it can throw you off initially. Observe the small fraction marks on the tape measure. They might seem minuscule, but they hold the key to decoding the measurements. Now, here’s the trick: you need to find the biggest fraction that the line falls under. Picture the scenario: the line sits between the ¼ and ½ marks. What do you do? You confidently read it as ⅜! It’s like a little puzzle, and once you crack it, you’ll be measuring fractions like a pro.
5. Utilize the Tape Lock
Most tape measures have a lock mechanism that holds the tape in place once extended. This feature is useful when you need to measure longer distances or take measurements without needing an extra pair of hands. Engage the lock by pressing the button or lever, and release it when you’re ready to retract the tape.
6. Add or Subtract Measurements
Sometimes, you may need to add or subtract measurements. For precise measurements, ensure the tape measure’s end aligns perfectly with the initial point of the object you intend to measure. Take the first measurement, and then continue from that point to measure the additional length. Finally, add or subtract the two measurements to get the total length.
7. Master Reading Overhead Measurements
When working on projects that involve measuring overhead distances, reading a tape measure can become more challenging. In such cases, use a small handheld mirror to reflect the measurement onto the tape, making it easier to read.
Mistakes Involved in How to Read a Tape Measure
Are you struggling with how to read a tape measure accurately? Reading a tape measure is vital in numerous industries and projects. By being mindful of the units of measurement, starting from the correct endpoint, accurately identifying fractions, etc., you can significantly reduce errors and increase overall accuracy. Focusing on these tips will help you with your mission – how to read a tape measure precisely.
1. Units of Measurement
One frequent mistake is disregarding the importance of paying attention to the units of measurement. Tape measures typically display measurements in both inches and feet and sometimes include markings for fractions or decimals. Overlooking these markings can lead to inaccurate readings. To prevent this misstep, take a moment to familiarize yourself with the specific tape measure you’re using and ensure that you fully comprehend the units being indicated. By double-checking the units before recording your measurements, you can steer clear of costly errors that could throw off your entire project.
2. Wrong Endpoint
Another common blunder is starting the measurement from the wrong endpoint. Many tape measures have a metal tab called the “hook” at the beginning, which should be aligned with the edge of the object you’re measuring. However, it’s quite common for people to neglect this alignment or fail to hold the tape measure securely against the object, resulting in skewed measurements. To avoid this error, always make sure the hook is properly positioned against the edge and hold the tape measure straight to obtain an accurate reading.
3. Estimating Fractions
Estimating fractions pose yet another challenge where mistakes frequently occur. Tape measures often include markings for fractions of an inch. Unfortunately, accurately identifying these fractions can be tricky, particularly for those new to working with tape measures. To enhance your accuracy, practice recognizing fractions and educate yourself with the specific markings on your tape measure. When uncertain, it’s better to round up or down to the nearest fraction rather than make an incorrect estimation.
4. Inconsistent Pressure
Inconsistent pressure during measurement is also a prevalent mistake to watch out for. Applying excessive or insufficient pressure when extending the tape measure can result in discrepancies in your measurements. Too much pressure can cause the tape to bend, leading to inaccurate readings, while too little pressure may result in slack tape and imprecise measurements. To ensure accuracy, maintain a consistent, gentle tension on the tape measure as you extend it.
5. No Double-Checking
Lastly, rushing through measurements without double-checking is a mistake that’s easily avoidable. Accuracy is crucial when working with a tape measure. It is important to double-check the measurements before you move ahead. Make sure your measurement aligns with the intended dimensions of your project to avoid costly errors and the need for rework.
Final Thoughts
Regularly practicing how to read a tape measure can be a valuable asset for the people involved in any task associated with precise measurements. By following the above-listed tips and tricks, you can successfully use the measuring tape and acquire accurate measurements.
Make sure to get yourself equipped with the basic elements of using the tape measure. It includes markings, increments, fractions, etc. Consistent practice on how to read a tape measure can enhance your speed and recovery.
Also, be aware of the common mistakes to avoid while reading a tape measure. Always remember, practice makes a man perfect!
Frequently Asked Questions
How to Read a Tape Measure – Explain Various Elements of a Tape Measure
A tape measure consists of several components, including the tape itself, the housing or case, the hook, and the measurement markings. To read a tape measure, start by locating the hook at one end of the tape. The hook is designed to catch onto the edge of an object to ensure accurate measurements. Next, observe the measurement markings on the tape.
How Do I Read Fractions as a Part of How to Read a Tape Measure?
Reading fractions on a tape measure may initially seem daunting, but with practice, it becomes easier to comprehend. Each inch on an imperial tape measure is typically divided into fractions. To understand fractions on a tape measure, begin by locating the number indicating the nearest whole inch to your measurement.
How Can I Accurately Interpret the Measurement Markings on a Tape Measure?
Understanding how to read a tape measure is essential for accurate measurements. When examining an imperial tape measure, the large numbers represent feet, while the smaller markings denote inches. Each inch on the tape is further divided into fractions. These fractions play a crucial role in achieving precise measurements. Similarly, a metric tape measure employs large numbers to represent meters, and the smaller markings correspond to centimeters.